Post by Geumlover on Sept 10, 2016 13:18:47 GMT
Quite a long while back now a friend came to visit and told us that an acquaintance of his had a large wooden glasshouse for sale. After some discussion about whether we needed another glasshouse, we decided that it was worth a look. Sadly the building in question was in such bad condition that I decided against it. However, the idea of having another glasshouse stayed with us.
As luck would have it we went a few weeks later we called in at a large Garden Centre on the way home from one of the National Trust properties. The Centre itself is largely uninteresting, but it does have toilets. Next door though is a business selling glasshouses and conservatories. It had that magic sign outside "Sale" Of course we went in. We bought an 8 foot by 12 foot ex-display model for half price AND that included delivery!
A week later the van arrived with the glasshouse all neatly re-packaged, but with no instructions as to how to put it together. The delivery man did apologise for that. Fortunately, having put together nearly a dozen aluminium glasshouse in my time, it was no problem. We still had the instructions from our other one of the same make.
There was no problem with siting the structure. We have a large area of concrete next to the work sheds (actually old stables!). The sheds provide shelter from the worst of the winds which we get and the ridge could run from South East to North West. This is not perfect alignment (North to South ) but better than nothing.
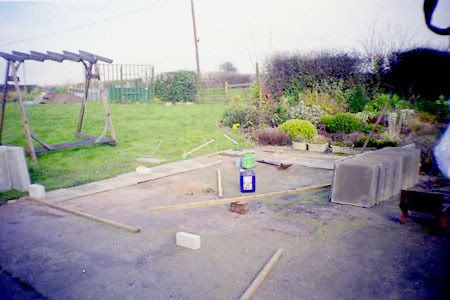
I had already decided that I was going to build really substantial staging in this new house and had bought the paving slabs and building blocks to do it. However, when I came to construct the base, to my horror I discovered that not only did the concrete slope towards the sheds, as I had expected, it also sloped from one side to the other. The amount of slope was considerably more than anticipated too. Instead of a simple single brick base I had to construct a platform. The top left hand corner was at concrete level, but the bottom right hand corner had to be raised by about 9 inches to make the platform level.
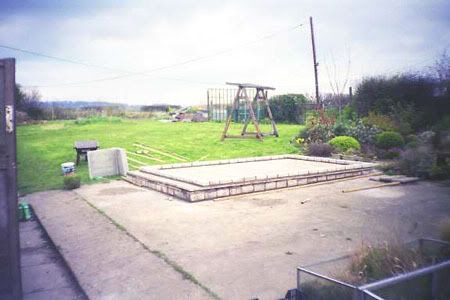
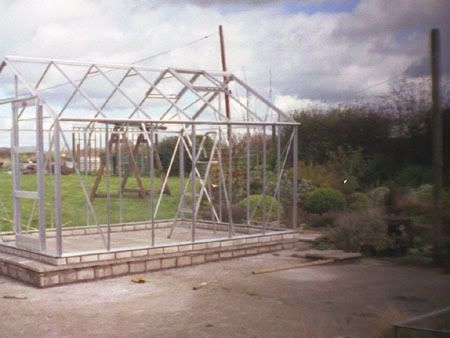
It delayed the erecting of the house somewhat I can tell you and increased the cost also. Still once the base was finished I could go ahead and put the aluminium jigsaw together. At this stage I did not add the glass. This was done after the staging was built.
Sadly the pictures of constructing the bases for the staging were lost by the processing company (We did not have a digital camera in those days). I built 5 brick piers on each side of the house. Across the top of those I put two concrete lintels. The 3 feet by 2 feet paving slabs rest on top of the walls and the lintels. This is an extremely strong construction.
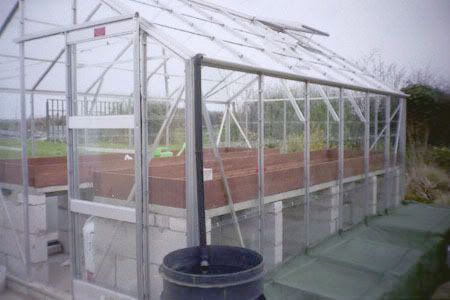
Having spent more money on the structure than I had anticipated, I merely added wooden sides to the staging. One side I used as a sand plunge for pots and the other I did make into a sort of permanently planted area.
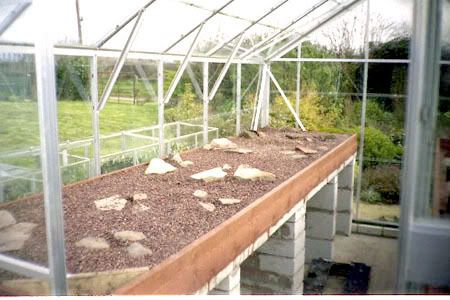
Finally the glass was added, leaving out the panes which normally go just under the eaves.
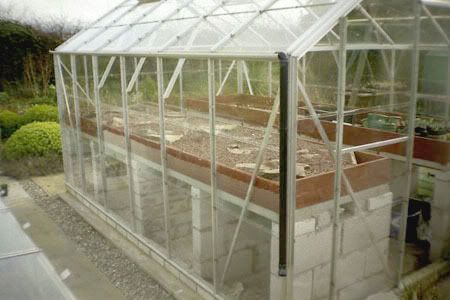
For about 18 months this is how it was used and very satisfactory it was too.
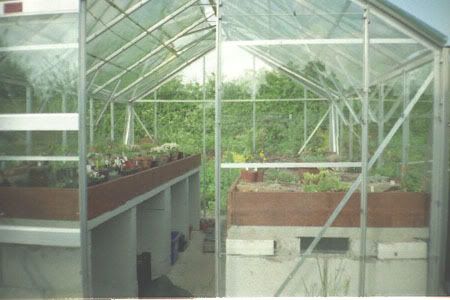
However, for some reason the wooden sides rotted very quickly and having saved up some money I could do some more with it. The first thing I did was to build a set of frames alongside the alpine house. These I could use as plunge beds for the plants which used to live in the alpine house sand. The brick structure was a useful place to dispose of a lot of rubble which we had taken from various other constructions around the garden.
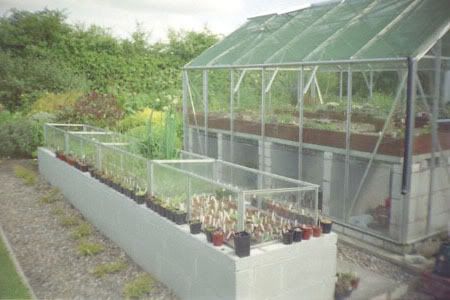
We go to our local group of the Alpine Garden Society once a month. There is usually a decent lecture, plant sales and experts on various subjects, willing to help. One of the lectures was on a new method of growing alpines, crevice gardens. Actually it was rather amusing, the first lecture was on modern trends in growing rock garden plants and the following month the lecture was on the horrors which people perpetrated in their attempts to grow rock garden plants. Many of the pictures were of the same constructions. You takes your pick......
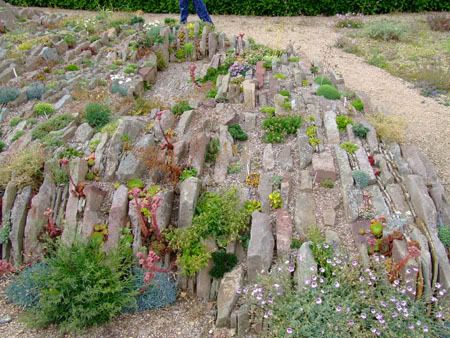
We were very taken with the idea of the crevice garden. I also bought a book about the same time called Miniature Gardens by Joachim Carl. This is mainly about troughs, but there are some pictures of crevice gardens in it. Best way to describe what is meant is to show a picture of the one at the AGS HQ,
The best way to build one of these in the alpine house seemed to be to use broken paving slabs. However, the only manufacturer of these locally wanted the same price for broken ones as for whole ones, so I had to think again. Then there was an article in the AGS Bulletin about hyper tufa. The answer was obvious really I would make my own ‘rocks’.
Making the rocks.
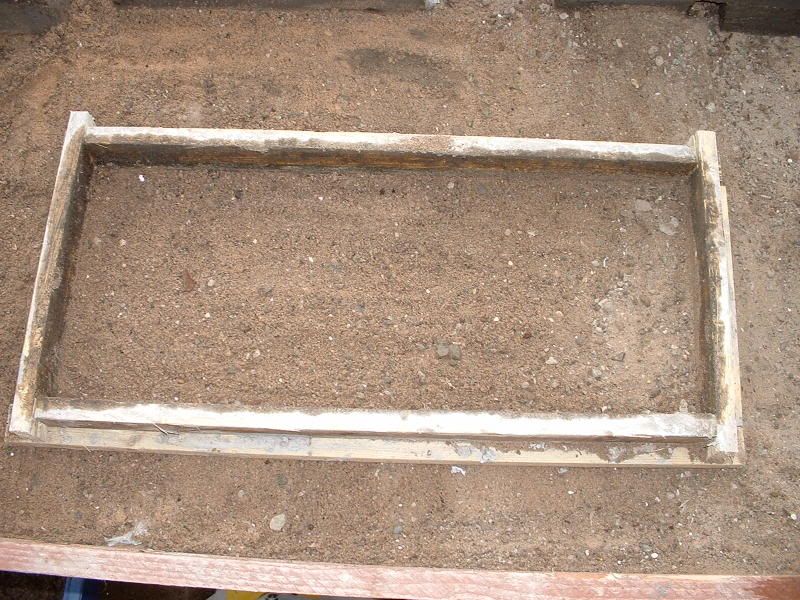
I first made three moulds using 25 x 38 mm, roofing laths. Each mould was 75 cm long by 25 cm wide and 25mm deep. They were placed on a bed of sand and lined with thin PVC sheet. The plastic was to stop the mixture from sticking to the sand and to make it easier to remove the slab from the mould.
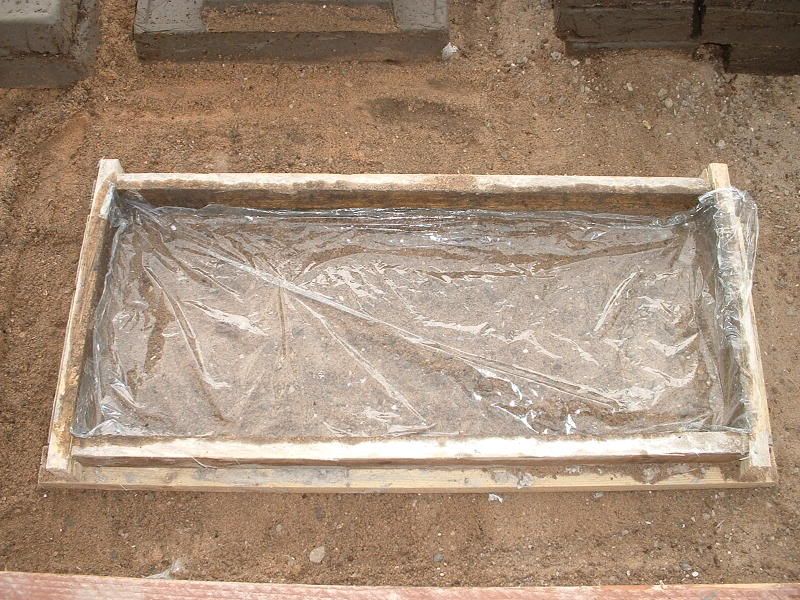
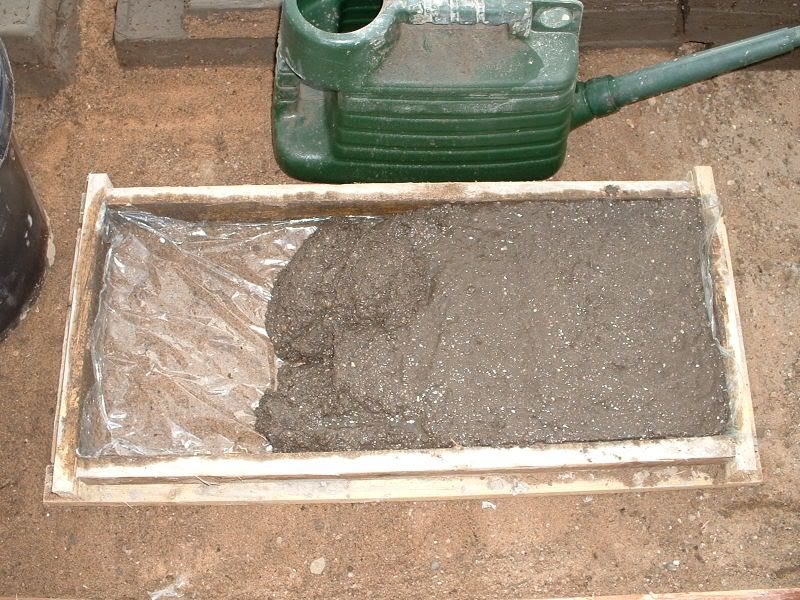
The mix I used was 1.5 parts of sifted coir to 1 part sharp sand and 1 part cement. (measured by volume). This is slightly stronger than the usual mix using 2 parts of coir. This was mixed dry and sufficient water added for it to be spread in the mould. This was left for a few days for the hypertufa to harden.
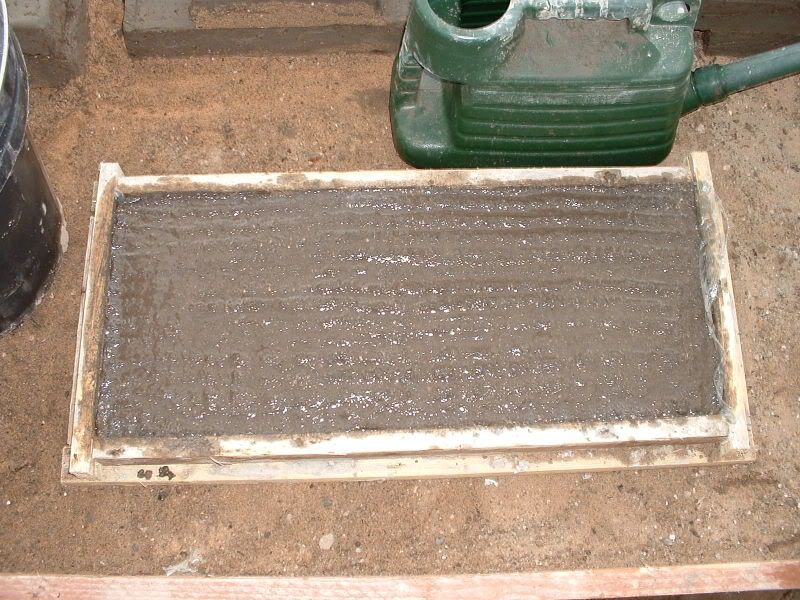
When each slab was hard enough to handle I removed the mould and marked where I wanted to split it into three roughly equal pieces.
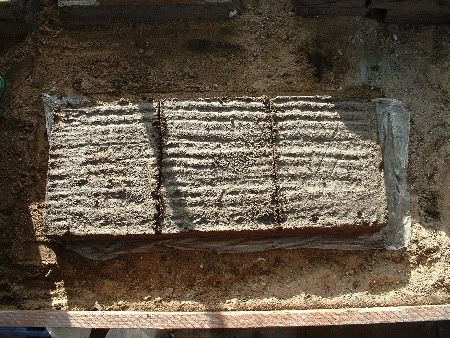
The slabs were then allowed to harden for a few more days before being split. I used an old saw to do this as the material was still soft enough to cut, but not hard enough to snap.
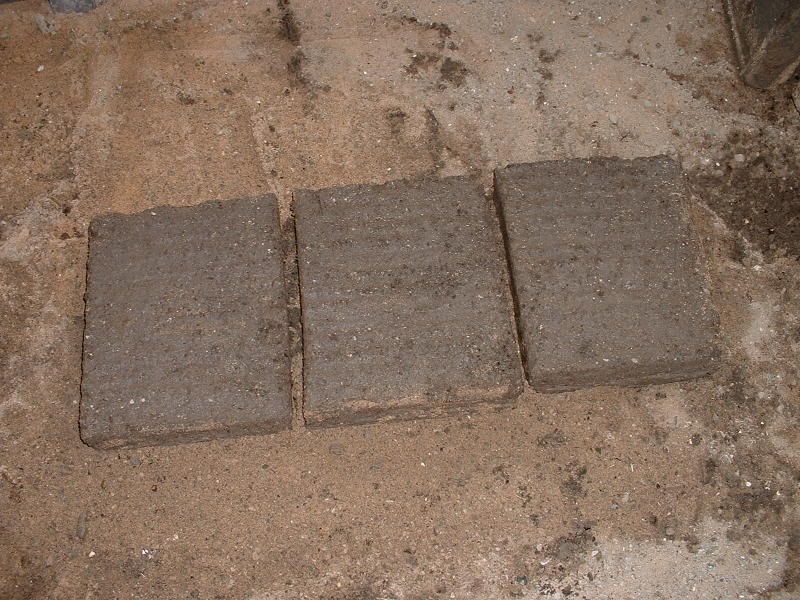
Finally the pieces were stood on edge to finish hardening and drying. I brushed over the smooth surface left by the plastic sheet to create a more natural looking finish. In all I made 42 castings in this way to give me 126 blocks with which to make the crevice garden. This took about 6 weeks from start to finish. The blocks were stood on the glasshouse floor to cure completely.
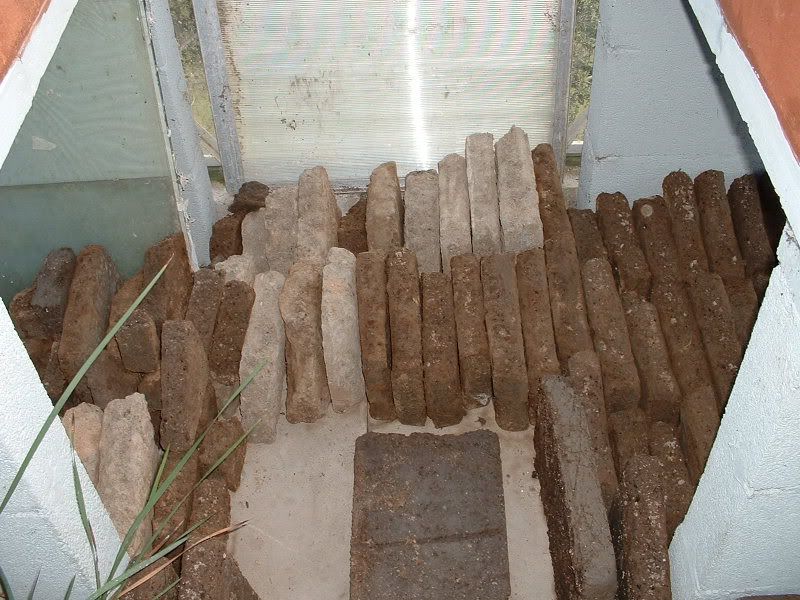
I was lucky enough to discover some ridge tiles in the garden. These I split and positioned along the back of the staging to provide support. I also left a couple of centimetres or so of the original sand plunge on the staging as support for the blocks until the compost was added.

Construction.
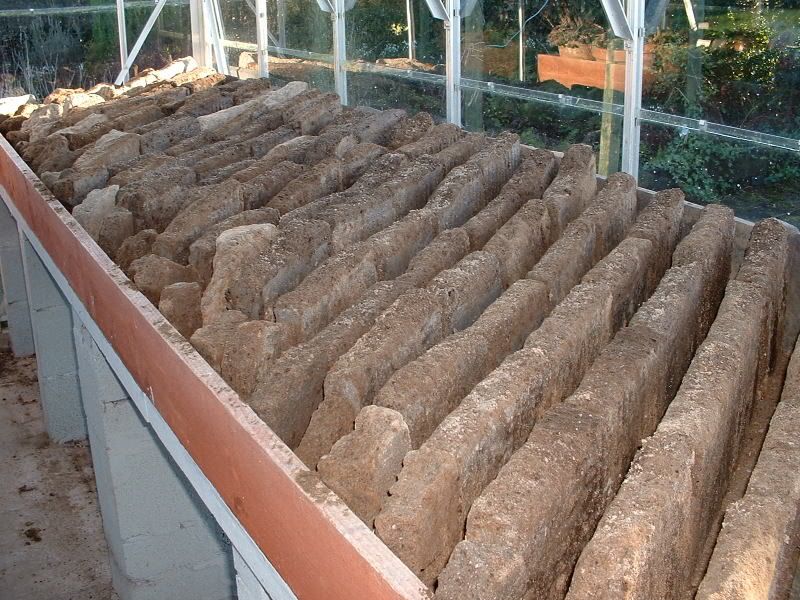
Before hitting on the idea of making the moulds I had made some hypertufa rocks. One of these was used as a corner piece. When laying the blocks I used a piece of 25 mm. roofing lath as a spacer, fashioning the crevices parallel to each other. After a few false starts I decided that the best looking arrangement seemed to be at an angle across the staging.
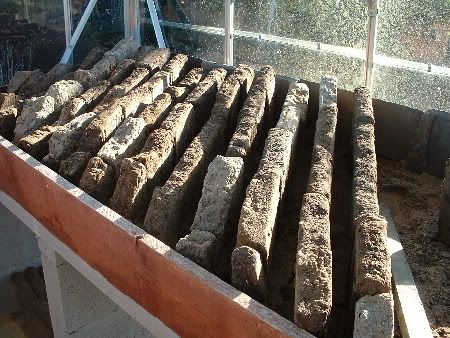
I also used the tallest blocks at the rear and sloped the construction slightly to the front. There is no particular need for a sloping surface, but it does make looking at the plants from the path a lot easier. I tried to avoid setting all the rows of blocks at the same height, to make it more visually interesting. After a lot of moving around it eventually looked like this.
Filling the gaps.
To fill the gaps I used a mixture of two parts of a compost made from ground bark and sterilised top soil to one of Perlite and 5mm grit. This is the standard mix I use for most of my plants. I did not add any fertiliser as there is a small amount in the compost and I do not want the plants to grow too quickly because of over-feeding them.
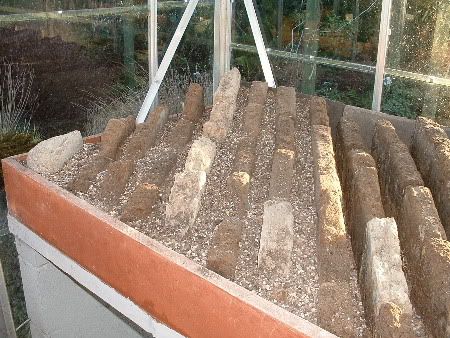
The next job was to water the compost and to press it down into the crevices. The ideal was that it was firm but not solid, so this was a delicate operation. I also had to avoid pushing the blocks out of place. As the soil in the adjacent crevice was not firm enough to hold the blocks in position. All I needed then was patience. It is necessary to give the compost time to settle and for any weed seeds to germinate before planting. After watering a few times and when I believed that settlement was complete I added a layer of 7mm. shingle to a depth of about 5 cm.
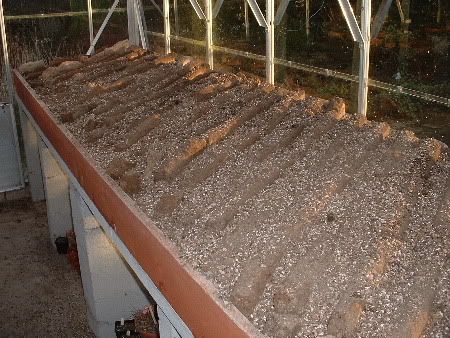
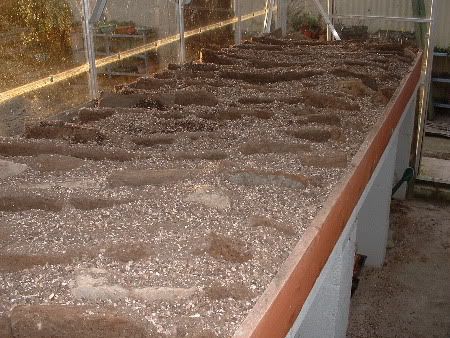
That accounts for one side of he Alpine house. On the other I decided to do something slightly different, but still using hypertufa.
This time rather than making blocks I made bricks. The mould was the kind of tray which is most often to be seen in schools.
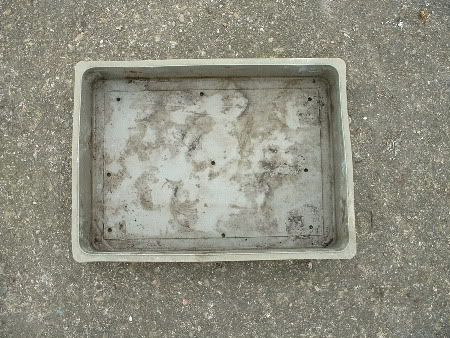
The method of casting is exactly the same as before except that the finished castings were sliced into bricks.
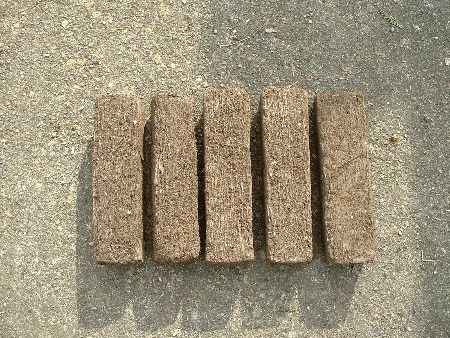
The staging was stripped down to the original pressed concrete slab.

I started building at the back, using hypertufa as mortar to hold the bricks in place.
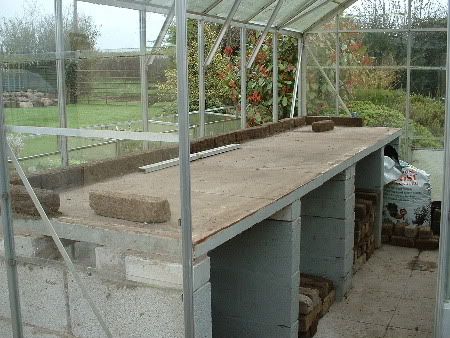
I put one layer all the way round, then started a second layer at the back.
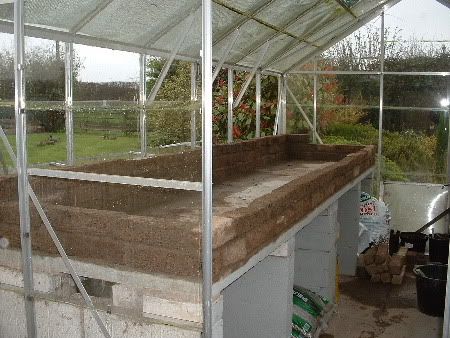
This second layer too went all the way round. Then at the back I added a third layer.
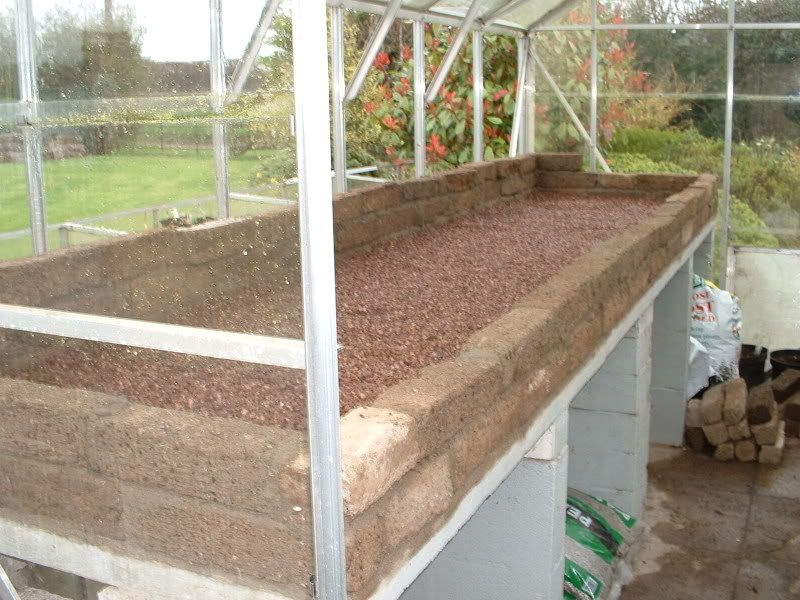
Finally I put two rows of bricks across to divide the area into three areas, the back is slightly higher than the front.
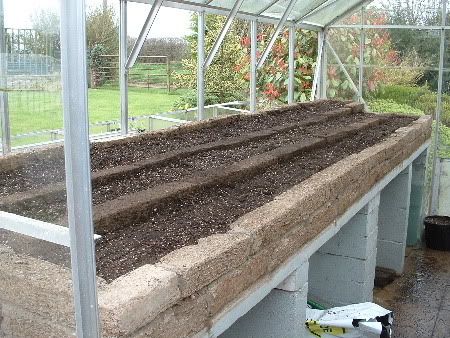
Again it was filled with my standard compost and left to settle before planting.
Planting
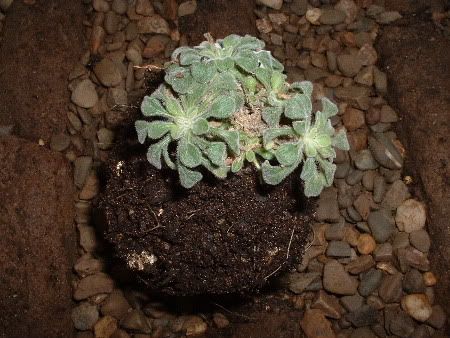
At last the exciting part. I went to an Alpine Garden Society Show at which there were a number of specialist nurserymen. I bought 30 plants suitable for growing under glass . This is one of them, an Erigeron.
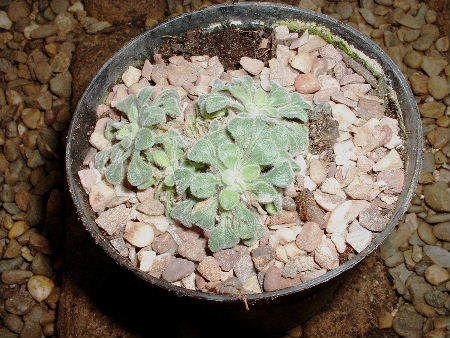
There actually is a technique used for planting up a crevice garden like this.
As you can see the original plant in its soil is wider than the gap in which it is to be planted. Also the soil in which it is growing is far richer than the soil in the bed and it also contains slow release plant food granules. I am also (after one or two bad experiences) a bit suspicious. In the past I have found both vine weevil grubs and root aphids in newly acquired plants.
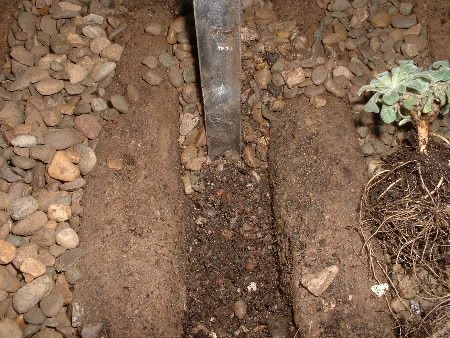
I gently removed as much soil as I could from the plant without damaging the roots. There are some plants which would react badly to this treatment. It would be unwise to treat Daphne for example like this or Acantholinum. It is wise to check in the books for the words, "does not like root disturbance" before one proceeds. I used a 2.5cm wide spatula to scrape away the gravel mulch and to dig a hole for the roots, making sure the hole is big enough for the roots be spread out.
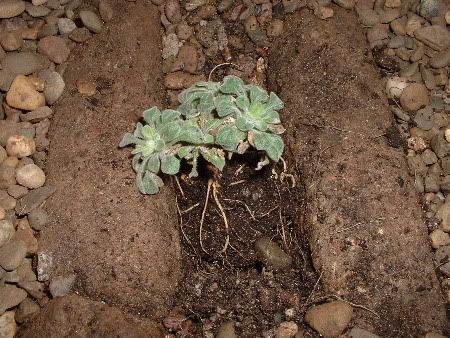
The roots are gently spread out in the hole and a little of my own compost used to cover them. The neck of the plant is left a little way above the soil level.
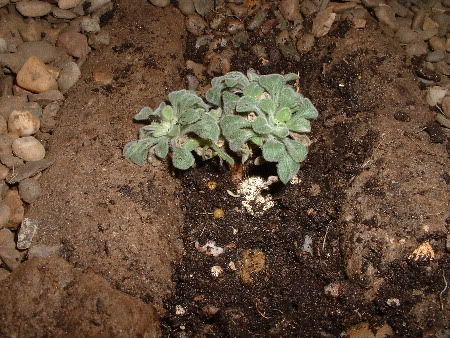
The gravel is then replaced, carefully tucking it under the leaves so that the neck of the plant is covered and the plant itself is sitting on the gravel. The whole process is repeated for the other plants.
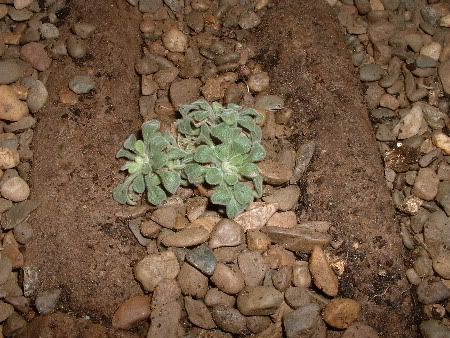
That is about it really, except to say that this is an account of what I have done, having plenty of space to build a dedicated alpine house. Many of the ideas may be adapted to suit other peoples needs etc. A friend has made himself a Crevice garden of this type on half of one side of his otherwise normal glasshouse. It works very well.
Been a few alterations since then. The wooden surround has been replaced with concrete bricks as it rotted away.
As luck would have it we went a few weeks later we called in at a large Garden Centre on the way home from one of the National Trust properties. The Centre itself is largely uninteresting, but it does have toilets. Next door though is a business selling glasshouses and conservatories. It had that magic sign outside "Sale" Of course we went in. We bought an 8 foot by 12 foot ex-display model for half price AND that included delivery!
A week later the van arrived with the glasshouse all neatly re-packaged, but with no instructions as to how to put it together. The delivery man did apologise for that. Fortunately, having put together nearly a dozen aluminium glasshouse in my time, it was no problem. We still had the instructions from our other one of the same make.
There was no problem with siting the structure. We have a large area of concrete next to the work sheds (actually old stables!). The sheds provide shelter from the worst of the winds which we get and the ridge could run from South East to North West. This is not perfect alignment (North to South ) but better than nothing.

I had already decided that I was going to build really substantial staging in this new house and had bought the paving slabs and building blocks to do it. However, when I came to construct the base, to my horror I discovered that not only did the concrete slope towards the sheds, as I had expected, it also sloped from one side to the other. The amount of slope was considerably more than anticipated too. Instead of a simple single brick base I had to construct a platform. The top left hand corner was at concrete level, but the bottom right hand corner had to be raised by about 9 inches to make the platform level.

It delayed the erecting of the house somewhat I can tell you and increased the cost also. Still once the base was finished I could go ahead and put the aluminium jigsaw together. At this stage I did not add the glass. This was done after the staging was built.

Sadly the pictures of constructing the bases for the staging were lost by the processing company (We did not have a digital camera in those days). I built 5 brick piers on each side of the house. Across the top of those I put two concrete lintels. The 3 feet by 2 feet paving slabs rest on top of the walls and the lintels. This is an extremely strong construction.

Having spent more money on the structure than I had anticipated, I merely added wooden sides to the staging. One side I used as a sand plunge for pots and the other I did make into a sort of permanently planted area.

Finally the glass was added, leaving out the panes which normally go just under the eaves.

For about 18 months this is how it was used and very satisfactory it was too.

However, for some reason the wooden sides rotted very quickly and having saved up some money I could do some more with it. The first thing I did was to build a set of frames alongside the alpine house. These I could use as plunge beds for the plants which used to live in the alpine house sand. The brick structure was a useful place to dispose of a lot of rubble which we had taken from various other constructions around the garden.

We go to our local group of the Alpine Garden Society once a month. There is usually a decent lecture, plant sales and experts on various subjects, willing to help. One of the lectures was on a new method of growing alpines, crevice gardens. Actually it was rather amusing, the first lecture was on modern trends in growing rock garden plants and the following month the lecture was on the horrors which people perpetrated in their attempts to grow rock garden plants. Many of the pictures were of the same constructions. You takes your pick......
We were very taken with the idea of the crevice garden. I also bought a book about the same time called Miniature Gardens by Joachim Carl. This is mainly about troughs, but there are some pictures of crevice gardens in it. Best way to describe what is meant is to show a picture of the one at the AGS HQ,

The best way to build one of these in the alpine house seemed to be to use broken paving slabs. However, the only manufacturer of these locally wanted the same price for broken ones as for whole ones, so I had to think again. Then there was an article in the AGS Bulletin about hyper tufa. The answer was obvious really I would make my own ‘rocks’.
Making the rocks.
I first made three moulds using 25 x 38 mm, roofing laths. Each mould was 75 cm long by 25 cm wide and 25mm deep. They were placed on a bed of sand and lined with thin PVC sheet. The plastic was to stop the mixture from sticking to the sand and to make it easier to remove the slab from the mould.


The mix I used was 1.5 parts of sifted coir to 1 part sharp sand and 1 part cement. (measured by volume). This is slightly stronger than the usual mix using 2 parts of coir. This was mixed dry and sufficient water added for it to be spread in the mould. This was left for a few days for the hypertufa to harden.


When each slab was hard enough to handle I removed the mould and marked where I wanted to split it into three roughly equal pieces.

The slabs were then allowed to harden for a few more days before being split. I used an old saw to do this as the material was still soft enough to cut, but not hard enough to snap.

Finally the pieces were stood on edge to finish hardening and drying. I brushed over the smooth surface left by the plastic sheet to create a more natural looking finish. In all I made 42 castings in this way to give me 126 blocks with which to make the crevice garden. This took about 6 weeks from start to finish. The blocks were stood on the glasshouse floor to cure completely.

I was lucky enough to discover some ridge tiles in the garden. These I split and positioned along the back of the staging to provide support. I also left a couple of centimetres or so of the original sand plunge on the staging as support for the blocks until the compost was added.

Construction.
Before hitting on the idea of making the moulds I had made some hypertufa rocks. One of these was used as a corner piece. When laying the blocks I used a piece of 25 mm. roofing lath as a spacer, fashioning the crevices parallel to each other. After a few false starts I decided that the best looking arrangement seemed to be at an angle across the staging.

I also used the tallest blocks at the rear and sloped the construction slightly to the front. There is no particular need for a sloping surface, but it does make looking at the plants from the path a lot easier. I tried to avoid setting all the rows of blocks at the same height, to make it more visually interesting. After a lot of moving around it eventually looked like this.

Filling the gaps.
To fill the gaps I used a mixture of two parts of a compost made from ground bark and sterilised top soil to one of Perlite and 5mm grit. This is the standard mix I use for most of my plants. I did not add any fertiliser as there is a small amount in the compost and I do not want the plants to grow too quickly because of over-feeding them.

The next job was to water the compost and to press it down into the crevices. The ideal was that it was firm but not solid, so this was a delicate operation. I also had to avoid pushing the blocks out of place. As the soil in the adjacent crevice was not firm enough to hold the blocks in position. All I needed then was patience. It is necessary to give the compost time to settle and for any weed seeds to germinate before planting. After watering a few times and when I believed that settlement was complete I added a layer of 7mm. shingle to a depth of about 5 cm.


That accounts for one side of he Alpine house. On the other I decided to do something slightly different, but still using hypertufa.
This time rather than making blocks I made bricks. The mould was the kind of tray which is most often to be seen in schools.

The method of casting is exactly the same as before except that the finished castings were sliced into bricks.

The staging was stripped down to the original pressed concrete slab.

I started building at the back, using hypertufa as mortar to hold the bricks in place.

I put one layer all the way round, then started a second layer at the back.

This second layer too went all the way round. Then at the back I added a third layer.

Finally I put two rows of bricks across to divide the area into three areas, the back is slightly higher than the front.

Again it was filled with my standard compost and left to settle before planting.
Planting
At last the exciting part. I went to an Alpine Garden Society Show at which there were a number of specialist nurserymen. I bought 30 plants suitable for growing under glass . This is one of them, an Erigeron.

There actually is a technique used for planting up a crevice garden like this.
As you can see the original plant in its soil is wider than the gap in which it is to be planted. Also the soil in which it is growing is far richer than the soil in the bed and it also contains slow release plant food granules. I am also (after one or two bad experiences) a bit suspicious. In the past I have found both vine weevil grubs and root aphids in newly acquired plants.

I gently removed as much soil as I could from the plant without damaging the roots. There are some plants which would react badly to this treatment. It would be unwise to treat Daphne for example like this or Acantholinum. It is wise to check in the books for the words, "does not like root disturbance" before one proceeds. I used a 2.5cm wide spatula to scrape away the gravel mulch and to dig a hole for the roots, making sure the hole is big enough for the roots be spread out.

The roots are gently spread out in the hole and a little of my own compost used to cover them. The neck of the plant is left a little way above the soil level.


The gravel is then replaced, carefully tucking it under the leaves so that the neck of the plant is covered and the plant itself is sitting on the gravel. The whole process is repeated for the other plants.

That is about it really, except to say that this is an account of what I have done, having plenty of space to build a dedicated alpine house. Many of the ideas may be adapted to suit other peoples needs etc. A friend has made himself a Crevice garden of this type on half of one side of his otherwise normal glasshouse. It works very well.
Been a few alterations since then. The wooden surround has been replaced with concrete bricks as it rotted away.


