|
|
Post by wildlifefriendly on Oct 8, 2011 16:39:33 GMT
Finished cementing in the slabs today, I still have the cobbling to do each side but that can wait.   I probably wont appear in the next edition of Homes & Gardens ;D but for a grand total of £4.50 I'm happy. |
|
|
|
Post by grindle on Oct 9, 2011 4:29:29 GMT
 job well done WLF, has it been road tested yet ;D
|
|
|
|
Post by wildlifefriendly on Oct 9, 2011 8:22:38 GMT
The road test is the most important part of any job ;D
|
|
|
|
Post by steve on Oct 9, 2011 8:42:40 GMT
Looks an ideal setting for a ploughmans lunch  (plus cider) |
|
|
|
Post by grindle on Oct 9, 2011 12:11:24 GMT
The road test is the most important part of any job ;D but of course ;D |
|
|
|
Post by Louise on Oct 9, 2011 18:35:16 GMT
Looks an ideal setting for a ploughmans lunch  (plus cider) Ooh, it's ages since i had cider - i was given some vintage cider a few years ago and it was just like champagne ..... just fancy some now  |
|
|
|
Post by wildlifefriendly on Oct 18, 2011 14:49:02 GMT
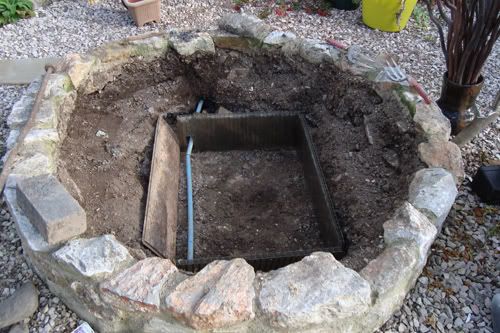
The making of a Sarracenia bog (I'm not sure it can be classed as wildlife friendly but I've always wanted one) Over the last week I’ve been building a bog garden for my Sarracenias. It didn’t all go to plan but I got there in the end. This is the raised, stone bed I was going to use. The plants in there never did well, mainly due to lack of watering.  I dug the soil out to a depth of twelve inches (30cm) and a further section in the centre for the water reservoir. This is where I hit hick-up No.1, this was exactly where the electric cable to the garden was buried.  No.2 hick-up was the liner, I needed 2.5m x 2.5m, the smallest I could buy off the roll was 4.5m wide or 4m x 4m ready cut, both were ridiculously expensive and very wasteful. I could have ordered it but patience isn’t one of my strong points. Tucked away in the garage was a huge bit of hole free liner, the problem with this was it was old so had become very stiff. It would just take a lot more work.  Eventually with a lot of folding and growling I got it to fit. I placed an old bread basket upside down over the reservoir and covered this with capillary matting. I put a pipe in for ease of filling the reservoir.  Next came a breathable membrane, this would stop all the peat filling the reservoir.  An inch of silica gravel.  It was topped up with a 50/50 mix of sphagnum moss peat and silica gravel. I trimmed the pond liner down to an inch below the surface and cut the pipe level with the soil.  Finally I researched the growing heights of the Sarracenias and planted them according to their height.  |
|
|
|
Post by grindle on Oct 18, 2011 15:30:44 GMT
that was a lot of work, but well worth it, I see where you put it now  looks great and I'm sure they will love it there |
|
|
|
Post by Lou78W on Oct 18, 2011 15:42:42 GMT
Another triumph WF ;D....well done you.....I'm assuming they don't mind the cold, snow, frost, etc.,  |
|
|
|
Post by peony on Oct 18, 2011 17:57:23 GMT
That was a big job to take on WF and a lot of hard work but the end result is well worth all your effort  |
|
|
|
Post by Cherry on Oct 18, 2011 19:11:34 GMT
That is truly fantastic. I had to read it twice to make sure I understood it properly. I am getting old you see. The hardstanding for the table looks great. Good landscaping.
|
|
|
|
Post by esther on Oct 19, 2011 4:47:01 GMT
Your Sarracenia bed looks great WLF  Are they all hardy? |
|
|
|
Post by Tel on Oct 19, 2011 5:53:18 GMT
A lot of hard work WF has gone into creating that bed. But the end result was well worth the effort.  |
|
|
|
Post by wildlifefriendly on Oct 19, 2011 18:17:46 GMT
Your Sarracenia bed looks great WLF  Are they all hardy? I've been assured they are, I've molly coddled them for years and have now taken the plunge and planted them out. |
|